Pages

Friday, April 1, 2011

Rice Pilaf


rice pilaf

I’m not usually a huge fan of rice. But this rice is special. It has cinnamon and clove and cardamom in it but it’s not sweet. It has an exotic, pungent flavor that I just love. So do my kids, they’ll eat this like they’ve never had food before! And it doesn’t take forever to cook, which is really nice. I like to serve this along side my favorite meatballs, also a Nigella recipe. Try it, you’ll love it too!


Rice Pilaf

Adapted from Nigella Lawson’s Feast

2 tablespoons olive oil

1 large onion, finely chopped

2 cloves

1 stick of cinnamon, broken into large pieces

3 cardamom pods, bruised

1/2 teaspoon cumin seeds

1/2 teaspoon nigella seeds, optional

2 1/2 cups basmati or jasmine rice

4 cups chicken stock


In a deep saucepan, heat the oil.

Sauté the onion along with the cloves, cinnamon, cardamom pods, cumin seeds and nigella seeds.

When the onion is translucent, add the rice.

Stir for a few minutes, then add the chicken stock.

Bring the mixture to a boil. Cover the pan with a lid and cook over the lowest heat possible for 20 minutes.

Turn off the heat, take the lid off, cover with a tea towel and clamp the lid back on the saucepan. You can leave the rice to rest like this for at least 10 minutes, and up to about 1 hour. Fork the rice through when you are ready to serve it.

Enjoy!

Thursday, March 31, 2011

On Top of Spaghetti, (Or Not)


fried meatballs

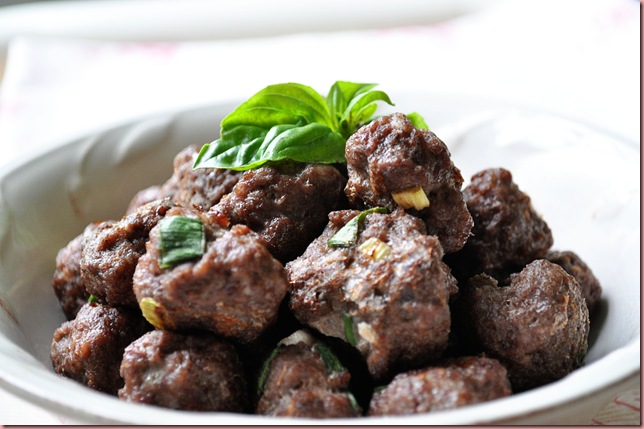
Oh my gosh, these are the best meatballs ever!!! They’re a Nigella Lawson recipe and every time I make them only about half of the recipe actually makes it to the table. *Ahem* They are so addicting! And the meatballs are tiny, so my kids just love them! The original recipe calls for lamb, and while I think they’re spectacular, my little kids are less than thrilled. So I substitute lean ground beef. They also have semolina flour in them, which gives them a really good, interesting texture. So, so yummy!
baked meatballs

I made them while my mom was visiting last time and she suggested baking them instead of frying them. I was skeptical, but except for losing their shape a bit and lacking that slight bit of crunch to the outside, they turned out pretty good! And much less fattening – not that I care too much about that ;)

You can freeze these meatballs ahead of time, and they make a great party appetizer! I usually serve them for dinner along side a big dish of rice, some roasted veggies and my favorite cheese bread. They’ve made it onto my list of Top Five Dinners of All Time, even! Just another note, if you’re going to be standing around rolling tiny meatballs, you may as well do a ton and freeze what you aren’t going to immediately eat! I usually triple this recipe.

Exotic Tiny Meatballs

Adapted from Nigella Lawson’s Feast

1 pound lean ground beef (or lamb)

1/4 cup finely chopped scallions

2 cloves garlic, grated or finely minced

1 teaspoon ginger, grated or finely minced

1/2 teaspoon ground cinnamon

1 teaspoon ground cumin

1 teaspoon ground allspice

1 teaspoon salt

3 tablespoons semolina flour

1 egg

vegetable oil for frying


In a large bowl, place the ground meat, scallions, garlic, and ginger.

In a small bowl, whisk together the cinnamon, cumin, allspice, salt and semolina.

Add spice mixture to the meat mixture.

Use the same small bowl (cuts down on dishes!) and beat the egg lightly, add to the meat mixture.

Use your hands and mix everything very thoroughly.

Cover with plastic wrap and refrigerate for 30 minutes.

Set out a small bowl of water and a baking sheet.

Dampen your hands with a bit of the water and scoop out about a teaspoonful of the mixture. Roll into a tiny ball and set on the baking sheet.

When all the meatballs are rolled, heat about 1/2 inch of oil in a frying pan. Line another baking sheet with paper towels.

Fry the meatballs in batches and avoid crowding the pan.

Cook for a minute or so on each side, until brown all over. Check one meatball from each batch with an instant thermometer to see that the meatballs are reaching 165 degrees. Try not to eat half of each batch. It’s hard, but I think you can do it. (Although I can’t!)

Alternatively, if you’d like to bake them, place the baking sheet in a 350 degree oven and bake for about 15 minutes. Check temperature with an instant thermometer to see that the meatballs are reaching 165 degrees.

You can freeze these either after frying or raw. If you freeze them raw you won’t be able to fry them, you’ll have to bake them later. Either way, they’re awesome! They take about 20-25 minutes to bake after they’ve been frozen.

Wednesday, March 30, 2011

Amelia’s Fairy Cakes

 
Fairy Cakes

My little girl loves tea parties. (Who doesn’t?) And many of the tea party books that she has depict tiny cakes as part of the spread. Not cupcakes and not always petit fours. (Thank Heaven for that!) Just little cakes. And this is good news for me because my little Amelia doesn’t like frosting and let’s face it, frosting cupcakes is where all the work is! I love it when your child wants something easy. (Because that is definitely a rarity in this house!) And these are perfectly easy, and a really perfect white cake recipe in general. The cake is delicately scented with lemon and has a beautiful tight, soft, crumb. It’s almost like a bakery cake or a cake mix, except that you get to control the flavor and there aren’t any strange, unpronounceable ingredients.

For these cakes, I got to use a really fabulous product from King Arthur Flour. It’s Tart Montmorency Cherry Concentrate and it is outrageously wonderful! I got hooked on dried Montmorency cherries when we lived closer to a Costco and I could get a big ole bag of them for a song. (They are SO much more expensive here in Maine!) But with this one bottle of concentrate, I can add that tart, snappy flavor to anything I want! I did a few test runs of some of my old standbys and decided that I prefer to drizzle it on after the baked good in question has come out of the oven. When I tried baking it right into the recipe it lost some of it’s bright flavor and it sunk to the bottom of the baking pan (where it sometimes burned, sad.). Jay gives me a really hard time if I use anything but maple seeeerup on my pancakes, but I gladly took one for the team and poured some of this onto a big stack. Heavenly! It is very tart, so a little goes a long way.

 
cherry concentrate

I think it’s very economical as well. A 16 ounce bottle sells for $16.95. (And that’s made with the juice from over 1000 pressed cherries! Cool, huh?) I’ve used it in these cakes, scones, pancakes, and drizzled over lemon ice cream (oh.my.gosh!!!) and I’ve only used about 2 and a half ounces! And guess what, my lovely bloggy friends? King Arthur Flour has graciously offered a bottle of Montmorency Cherry Concentrate for one of you lucky readers! Wheeee! And all you need to do to enter is leave a comment on this post! Easy Peasy!
 
Amelia’s Fairy Cakes
 
 
zest of 1 lemon
 
1 1/2 cups sugar
 
1 stick butter, at room temperature
 
4 egg whites, at room temperature
 
2 1/4 cups cake flour
 
1 tablespoon baking powder
 
1/2 teaspoon salt
1 1/4 cups buttermilk, at room temperature
 
1/4 cup Tart Cherry Concentrate
 
1 1/2 cups white chocolate chips
 
1 teaspoon shortening
 
Royal icing or pressed sugar flowers to decorate
 
Preheat the oven to 350 degrees. Line two 12 cup muffin tins with pretty liners. (Alternatively, you can prepare two 9” cake pans, one 9x13 baking dish or one baking sheet (jellyroll pan), you’ll just need to  adjust the baking time.)
 
In the bowl of your mixer, combine the sugar and the lemon zest. With your fingers, massage the zest into the sugar. (This releases the oils in the zest and really pulverizes it, the air will smell absolutely luscious!)
 
Attach the beater to your mixer and beat in the butter until the mixture is very light and fluffy.
 
Add the egg whites and beat until well combined.
 
Whisk together the cake flour, baking powder and salt.
 
Add 1/3 of the dry mixture to the batter and beat.
 
Pour in about 1/3 of the buttermilk and beat.
 
Repeat this process until all the ingredients are incorporated. Scrape down the bowl VERY WELL and beat until all the ingredients are well incorporated.
 
Pour into prepared pans and bake until the cakes spring back when you gently touch them with your finger; about 20 minutes for cupcakes, 35 minutes for 9” cakes and the sheet cake, or 45 minutes for a 9x13” dish.
 
Remove cakes to a cooking rack. While the cakes are cooling, drizzle about a teaspoon of cherry concentrate
on the top of each cake.
When the cakes have thoroughly cooled, melt the white chocolate chips in the microwave using 30 second bursts of power to avoid burning the chocolate.
 
Stir in the shortening.
 
Spoon a tablespoon of the chocolate over the cake, swirling it around until it settles and press a flower into the center of the cake.
 
Let chocolate harden, about 30 minutes.
 
Enjoy with the darling little girl of your choice :)
 
P.S. Don’t forget to leave a comment on this post for your chance at a free bottle of Montmorency Cherry Concentrate! You’ll be glad you did!
 
P.P.S. This giveaway will close on Wednesday, April 6th at midnight. Good luck!

Not Oreos


chocolate sandwich cookies

These are not Oreos. These are better than Oreos. Oreos are very good in their own way, there’s still nothing like pulling one apart, licking out the vanilla center, putting the wafers back together and dunking them in milk. But sometimes that vanilla frosting in the center leaves a funny film on the roof of your mouth and then you usually have to go brush your teeth immediately afterwards or risk having little specks of black wafer lurking, just waiting to wedge themselves between your front teeth and embarrass the heck out of you.

These cookies don’t want to embarrass you. And, while a tall, icy glass of milk is a perfect complement to these cookies, they don’t need it to camouflage the store-bought taste of them. Because they’re not Oreos. They are Homemade Chocolate Sandwich Cookies.

You’ll want to make these today. Really. Truly. Today.

Chocolate Sandwich Cookies

Adapted from Smitten Kitchen

For the chocolate wafers:

1/2 cup plus 2 tablespoons butter, at room temperature

1 1/2 cups sugar

1 large egg

1 1/4 cups all-purpose flour

1/2 cup cocoa powder (You know how much I love King Arthur’s.)

1 teaspoon baking soda

1/4 teaspoon baking powder

1/4 teaspoon salt


For the filling:

4 tablespoons butter, at room temperature

1/4 cup shortening

2 cups sifted confectioners sugar

2 teaspoons vanilla extract


Preheat the oven to 375 degrees. Set out 3 baking sheets.

In your mixer, beat the butter and sugar until light and fluffy.

Add the egg and mix well.

In a medium bowl, combine the flour, cocoa powder, baking soda, baking powder and salt.

Add to the batter and mix very well.

Drop by tablespoonsful onto the cookie sheets, 12 to a sheet. Dampen your hand with a little water and press down slightly on each ball of cookie dough.

Bake for 10 minutes. Remove to cooling racks.

While they’re cooling, make the filling!

In your mixer’s bowl, beat the butter and shortening together until well incorporated.

Add the vanilla and mix well.

Sift in (using a mesh sieve, for Heaven’s sake, not an obnoxious, old fashioned sifter!)  the powdered sugar and mix to combine.

Scoop the frosting into a pastry bag and pipe onto the underside of a cookie. Place another cookie on top and press lightly to seal them together. Lather, rinse, repeat.

Serve to your newly turned six year old, alongside a tall, icy glass of milk, and hear all about how he gets to marry the princess the next day at recess, but only if he can save her from the robots and swamp monsters.

Wednesday, January 12, 2011

Pop on Over!


Popover

It just started snowing for our second big snowstorm this year. Can you believe it? The middle of January and this is only our second really big storm? I was told, by a certain someone who shall remain nameless, that New England is buried in six foot tall snowdrifts from October to April. Lies. All lies! I love snow, I was looking forward to snow. I’ve got a large chocolate stash and have been waiting with bated breath for a decent snowstorm so I can have a great excuse to make large pots of hot chocolate. I don’t know why, but I find falling snow SO comforting. Well, when I’m warm and cozy in my house watching it through icy windows anyway. And right now it’s perfect, falling thick and fast and pretty much demanding that I make something hot and comforting to go with it!

Have you ever seen the 1949 version of Little Women? I love that movie! I used to watch it when I’d spend time at my grandma’s house when I was little. Probably one of the reasons I loved it so much was that my grandma would make me popovers every time! Do you remember that scene when the girls go to visit a friend and Amy wants to eat all the popovers on the way over? I loved Amy. I must have sensed a kindred spirit in a fellow popover hog.

I love this recipe for popovers because you don’t need any fancy equipment or ingredients. You probably have all the ingredients on hand right now and you don’t stress about popover pans, just use a muffin tin! I make it in my blender, but you can just as easily whisk the ingredients together by hand. Try them today, they’re divine! And Amy and I promise not to judge if you want to eat them all yourself. 


Popovers

Yields 9 popovers

Adapted from Baking with Julia

1 cup flour

1 cup whole milk

1/2 teaspoon salt

2 teaspoons sugar (optional: I have a sweet tooth.)

3 eggs, at room temperature

2 tablespoons butter, melted


Preheat the oven to 425 degrees. Spray two 12-cup muffin tins with spray. (You can also make these in buttered ramekins.)

In a blender or food processor, combine all ingredients. Blitz until smooth.

Pour through a strainer into a liquid measuring cup. (You’ll have about 2 cups of batter.)

Pour about 1/4 cup of batter into the muffin tins, using every other cup. This is so the popovers have enough space to pop!

Bake for 15-25 minutes without opening the door. The popovers should be puffed and golden. (The original recipe says 25 minutes, and my oven might be running a little hot, but mine were perfectly golden at 15 minutes. You’re just working on the exterior at this point.)

Turn the temperature down to 350 degrees and bake for another 10-20 minutes to help dry out the interior. (Again, mine were done at 10 minutes, you don’t want to overcook them. Just keep an eye on them!) The centers will still be slightly underdone and eggy, that’s my favorite part.

Serve immediately. We like them dripping with butter and honey and served alongside large mugs of hot chocolate. Enjoy!