Pages

Showing posts with label tips. Show all posts

Wednesday, June 30, 2010

I Scream, You Scream, We All Scream for ICE CREAM!

StrawberriesTU   

I love living on the East coast. There are so many little things that are totally different than things back home in Utah. For instance, the way people just stick a sign out on their front yard and sell things. Every time I drive somewhere I have the opportunity to pull off the side of the road and pick up a few lettuces, or a dozen eggs, or a loaf of bread, or mmmmmmmm, strawberries!!! I was on my way to take Amelia to the doctor when I saw a great big strawberry shaped sign. I had a carful of whiney kids in need of distraction, so I pulled over. It was a really cute farm stand lined with rows of punnets full of tender, juicy, ruby colored strawberries. *sigh* I kind of didn’t want to get back in the car, I just wanted to plop down there on the lawn and stuff myself full of berries until I could get the screaming/whining ringing buzz from the kids out of my head! We’ve gone through half a dozen punnets (yes, I just really like to use that word!) of berries so far. Most of them we’ve just munched through, but I did make this cake of my mom’s. It’s so very, very, very good! Then I made this ice cream which is perfectly ideal for a warm afternoon lounging in the backyard. It is, as the title suggests, old fashioned. Not the smoothest, creamiest ice cream like, say, this one, but a quick, yummy, rustic ice cream that I think you’ll love too.

ice creamTU


Old Fashioned Strawberry Ice Cream

2 cups strawberries, hulled and halved

3/4 cup of sugar, divided

ice water

1 pint half and half

2 large egg yolks


In a medium glass or stainless steel bowl, combine the strawberries and 1/4 cup of the sugar.

Mash those puppies up really, really with a fork or potato masher. You really don’t want big chunks of strawberries left because they will freeze solid and aren’t much fun to encounter in a nice dish of ice cream. Set the strawberry bowl in a bowl of ice water.

In a medium saucepan, bring the half-and-half and 1/2 cup sugar to a simmer, stirring occasionally over medium heat.

In a heatproof bowl, whisk the egg yolks and then gradually whisk in about 1/2 cup of the milk mixture.

Pour the mixture into the saucepan and cook, whisking constantly, over medium heat until steaming hot and frothy, about 3 minutes.

Strain the custard into the bowl of strawberries. Let stand, whisking occasionally until cool.

Pour the cooled custard into the bowl of your ice cream maker. Process for about 20 minutes. If you absolutely can’t wait any longer you can go ahead and eat it now, it will be soft-serve consistency.

soft serveTU

For regular ice cream, transfer to an airtight container and freeze for at least 4 hours.


 wfmwbannerKRISTEN

So, I have a quick Works For Me Wednesday tip for you. I used to freeze my ice cream in tupperware containers, which works fine, except that the ice cream tends to get freezer burned around the edges fairly quickly. I’m not sure why, but if you clean out a store-bought ice cream container and freeze your homemade ice cream in it, it tends not to get freezer burn! Sweet!


ice cream tubTU

P.S. Please stop by We Are THAT Family to see all the other great tips!

P.P.S. This is my very favorite store-bought ice cream. Oh my goodness.

P.P.P.S. I’m sure if you had the time and inclination you could mod podge your container up all cute-like. I didn’t have the time or inclination :)

P.P.P.P.S. I recently had to replenish my stash of pressed sugar eyeballs. I bought them in bulk and got a great deal, so you can probably expect to see more of them around these parts. We’ve been ‘eyeballing’ everything lately! I do have to say that a mound of scrambled eggs are somewhat disconcerting when they are looking back at you though. On most foods the eyeballs look cute or startled. On scrambled eggs they look insane and horrified. Just thought you should know ;)

Wednesday, November 11, 2009

Google Reader is Totally Going to Work for You!

wfmwbannerKRISTEN

This, my friends, is Google Reader. I know most of you know what this is and probably love it as much as I do, so you can feel free to go about your merry way. But I do know there are a couple of you looking at me like, ‘what the heck is she blathering on about now, I’ll just skip down to the food pictures.’ Well, STOP! There are no food pictures today. No, wait, don’t go yet!!! You need to know about Google Reader first.

image

Since you didn’t get to my site this morning from Google Reader that means you either had my blog bookmarked (thank you!), you manually typed in my web address (again, thanks!), or you clicked on me from a link. (and aren’t you glad you did? lol!)  Now, I’m going to assume that if you like to read my blog, you probably like to read other blogs. What’s not to like, there’s a whole world out there, a blog on every topic imaginable! Wouldn’t it be nice if instead of you searching through your bookmarks every day and visiting all your blogs separately, someone got to your computer ahead of you and got all the new postings up for you? Then all you would have to do is grab a cup of coffee and read all the new entries. Wouldn’t that be FANTASTIC?!? Kind of like a daily magazine that you get to design for yourself! That is what Google Reader is.

I follow 101 different blogs. That’s a lot of extraneous clicking, if you ask me. And not everybody posts every single day. So there’s some wasted clicking. Google Reader automatically finds all the new posts and brings them to me every morning.  Sounds awesome, right? Well, let’s get you signed up! Go to https://www.google.com/accounts 

image

First things first. Do you have a Google account? I use gmail, so I have an account. It also lets you create a Google ID, which comes in mighty handy when commenting on bloggers’ posts for one thing. Ok, get yourself a Google account and sign in.

image

Once you’re signed in you should come to this page. . .

image

Go down to the bottom where it says ‘more’, and give it a click.

Scroll down a bit to where it says ‘Reader’ (in the right hand column)

image

Give ‘Reader’ a click and you should see this. . . .

image

Welcome to Google Reader!!! Now you need to add some subscriptions. There are many ways to do this. Let’s start by leaving this window open and opening another. Now go to your favorite blog, say. . . . http://tuffetblog.blogspot.com/?

image

Right under the lovely header on this randomly selected blog, you see the words Posts RSS. I forget what RSS stands for (I’m sure you could Google it if you must know), but that is what you’re looking for. Give it a click. P.S. This is in different places on every blog, just search around until you find it!

image

It takes you to a screen with different options of having the site’s feed delivered to you. Since the only one I’m familiar with is Google Reader, and since it’s the title of my post, we’ll go with that. Click on the little button that says ‘+Google’.

image

The page will automatically take you back to your reader and tell you that you need to click the button to subscribe. Everybody’s doing it, go ahead! Click the button!

image

There, you’ve subscribed! Google Reader will thoughtfully bring you the last 10 posts of the blog you’ve just subscribed to and from that point out it will bring you every new post the blogger puts up! Done! No more extraneous clicking!

But wait! What if you can’t find the button on the blogger’s page that lets you follow? What will you dooooooooo?

Calm down, I’ll tell you. First, let’s go to a different blog. Say, for instance, http://songberries.blogspot.com/ 

image

Let’s skip looking for the button altogether. Just go up to the address bar and highlight it. Then press CTRL+C to copy it. Now, switch tabs back to the Google Reader that you left open earlier.

image

Do you see the button at the top of the left hand column that says, ‘+ Add a Subscription’? Click it!

image

It opens a little box right underneath. Click inside the box and press CTRL+V to paste the web address in.

image

Or, if you’re old school, you could just type it in the box yourself. Now click on ‘add’ and presto! Another blog added to your reader!

image

Now all you need to do is take five minutes and enter in all the blogs you have bookmarked and just watch all the posts fly in! Easy-peasy!!!

There are all sorts of cool things that Google Reader can do for you, this post would be a mile long if I listed all of them. Some of my favorites show up at the bottom of each post.

image

See the bar right under ‘Carol’ that says ‘add star’, ‘like’, ‘share’, ‘share with note’, ‘email’ etc? That’s an awesome bar right there! When you read a cool post that you think might appeal to your Great-Aunt Edna you can just click ‘email’.

image

Enter Great-Aunt Edna’s email address, write a quick note and hit send! And Google Reader will send your note and the post to her! Cool, huh!!!!

You can also click the little star next to ‘add star’. That will put a star on it (duh) and it automatically saves it for you! See in the left hand column, where it says ‘Starred Items’? Click that.

image

Look! There it is! And you hardly had to do anything! Awesome!

Okay, what if you saw a recipe in a food blog and you don’t remember whose it was? What if you forgot to star it? What then? Are you sunk? Do you have to wade through your history? No. This is so cool! Watch this!

Go up to the top of the screen. There is a search box just to the right of the words ‘Google Reader’. Type in what you’re looking for. Whoopie pies, for example. Who isn’t looking for whoopie pies?

image

Look at that!!! Coooooooooooooooooooooooool!!!!!!

So, now you have a shiny new toy to play with, and zero excuse not to keep up on your favorite blogs! Enjoy!

Now pop on over to We Are That Family and bone up on all the other great tips!

Wednesday, August 26, 2009

Are You Drooling Yet? Here, Let Me Find You a Napkin. . .


This was a Baking Beauties assignment that they did before I joined. And since I joined because I wanted to try more of the recipes in that wonderful baking book I decided to go ahead and make it anyway. The one issue I have with this recipe is that it is made in a loaf pan. Which says 'quick bread' to me. And quick bread is a breakfast food, right? So, now, Julia has me eating a CAKE masquerading as a quick bread for breakfast! Maybe 'inhaling' is a more accurate word. This is a absolutely wonderful recipe and would be a stunner of a breakfast to serve to house guests. (Because it's really cake! Haha!)


Lemon Loaf Cake
Adapted from Baking with Julia

4 eggs, room temperature

1 1/3 cups of sugar

pinch of salt
zest of 3 large lemons

1 3/4 cups cake flour

1/2 teaspoon baking powder

1/4 cup lemon juice

1/4 cup heavy cream, room temperature

5 1/2 tablespoons butter, melted and cooled to room temperature


Preheat the oven to
350 degrees. Prepare a loaf pan.
In a large bowl, whisk together the
eggs, sugar, and salt for just a minute, until foamy.
Whisk in the
zest.
Sift together the
flour and baking powder.
Whisk a third into the lemon mixture until incorporated.
Whisk in another third until incorporated.

Whisk in the last of the flour.

Whisk in the cream.
Switch to a rubber spatula and fold in the
melted butter.
Pour the batter into the loaf pan.

Bake for
50-60 minutes.
Let rest in the loaf pan for
10 minutes before unmolding.

I garnished it with about a cup of sliced strawberries macerated in a teaspoon or two of sugar. And I topped it with a 1/4 cup of softened butter, a teaspoon of sugar, and 2 tablespoons of chopped basil.


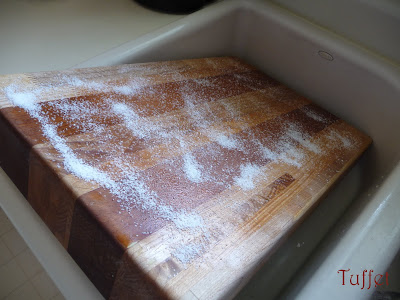
And now for the Works for me Wednesday portion of our show my post. What to do with those leftover lemons! I only used one for the lemon juice which left me with two naked lemons left over. The first one went into my favorite marinade. The second one I used for cleaning my cutting board. I bought this little lovely at a thrift store for 7 bucks, and the poor thing had never been used! It's a little battle-scarred now, but I try to take good care of it. I clean it with a lemon and kosher salt and soothe it with olive oil.

Place the cutting board in the sink. (Catches all the mess.)

Wipe the board down with a very wet cloth.

Sprinkle all over with kosher salt.

Cut a lemon in half and use it to scrub the whole board down.

Don't forget the edges and sides!

Wipe the salt off with a damp cloth.

Drizzle with olive oil.

Rub the oil in with a paper towel. (Don't forget edges and sides!)
Stand on side to help prevent any warping.

All done!

Cut up the lemon and run it through your garbage disposal to freshen it.

Kosher salt and lemons work for me! Head on over to We Are That Family to see what works for everyone else!